Choosing the Right Colored Pencils
The first step to great, vibrant coloring is choosing the right colored pencils to begin with. Not all colored pencils are created qual and the quality can impact how your final artwork turns out. There are two main types of colored pencils: wax-based and oil-based. Wax-based colored pencils, like Prismacolor Premiere pencils, are known for their rich pigmentation and smooth application. They are ideal for blenduing and layering. The downside is that the wax-based can be easiily boriken. Oil-based colored pencils, like Faber-Castell’s Polychromos, have a harder core and are less likely to break. They each also offer a slightly different texture are ideal for showing the detailed works.
When choosing colored pencils, consider your budget and the type of artwork you want to create. High-quality professional-grade pencils may be more expensive, but the offer superior color payoff and durability. Student-grade pencils are more affodable and can be a good starting point for beginners. It’s also essential to test the pencils before purchasing to make sure that pencils wil mee your needs.
Another factor to consider is the color range. A set with a wide variety of colors givesw you more options and flexibility in your art. Some brands offer sets with up to 150 colors, while some sets are much smaller. If you are just starting with watercolor pencils, a set of 24-48 colors should be enough. Remember, you can alsready makea. significant difference in vibrancy and the quality of yoru finished artwork.

Essential Tools for Colored Pencil Art
In addition to colored pencils, there are several essential tools that can improve your coloring experience. One of the most important tools is a good quality pencil sharpener. A dull pencil can leasd to uneven lines and make it more challenging to achieve fine details. Look for a pencil sharpener that provides a sharp, clean point . While electric sharpeners are convenient, manual sharpeners will do the job without the extra vibration (which could contribute to the lead inside your pencil breaking).
Blending tools are another crucial component of colored pencil art. Blending stumps (also known as tortillions) are tightly rolled paper tools that can help you blend smoothly. They are expecially useful for creating gradients and soft transitions between colors. Additionally, a colorless blender pencil can help you blend colors easily without adding any additional pigment to your paper.
Finally, consider investing in a fixative spray for your art. Fixative can help protect your finished artwork from smudging or fading over time. When sprayed on a piece of art, fixative creates a protective layer that preserves the vibrancy of you art. Be sure to choose a fixative that is specifically designed for colored pencil art, as some sprays can alter the appearance of your colors. For the sake of your health, only use fixative spray in a well-ventilated area and be sure to follow the instructions that you find on the can.
Basic Techniques for Using Colored Pencils
There are a few basic techniques that are necessary to get the best results out of your colored pencils. One of the fundamental techniques is layering colors. Layering your colors means that you are slowly building up multiple layers of color, which builds depth and richness. Start with a light touch and gradually build up the color intensity. Using light, even strokes helps create a smooth and even application of color. Experiment with different pressure levels to achieve variations in color and shading.
Another technique is hatching and cross-hatching. Hatching is when an artist draws parallel lines close together to create shading and texture on a drawn object. Cross-hatching is pretty much the same thing except there is a second layer of lines going in a different direction. Cross-hatching creates a denser and more textured effect than hatching. Hatching and cross-hatching is a great way to create dimension and texture in your artwork. Experiment with pencil pressure and the spacing of your hatch marks to create different effects.
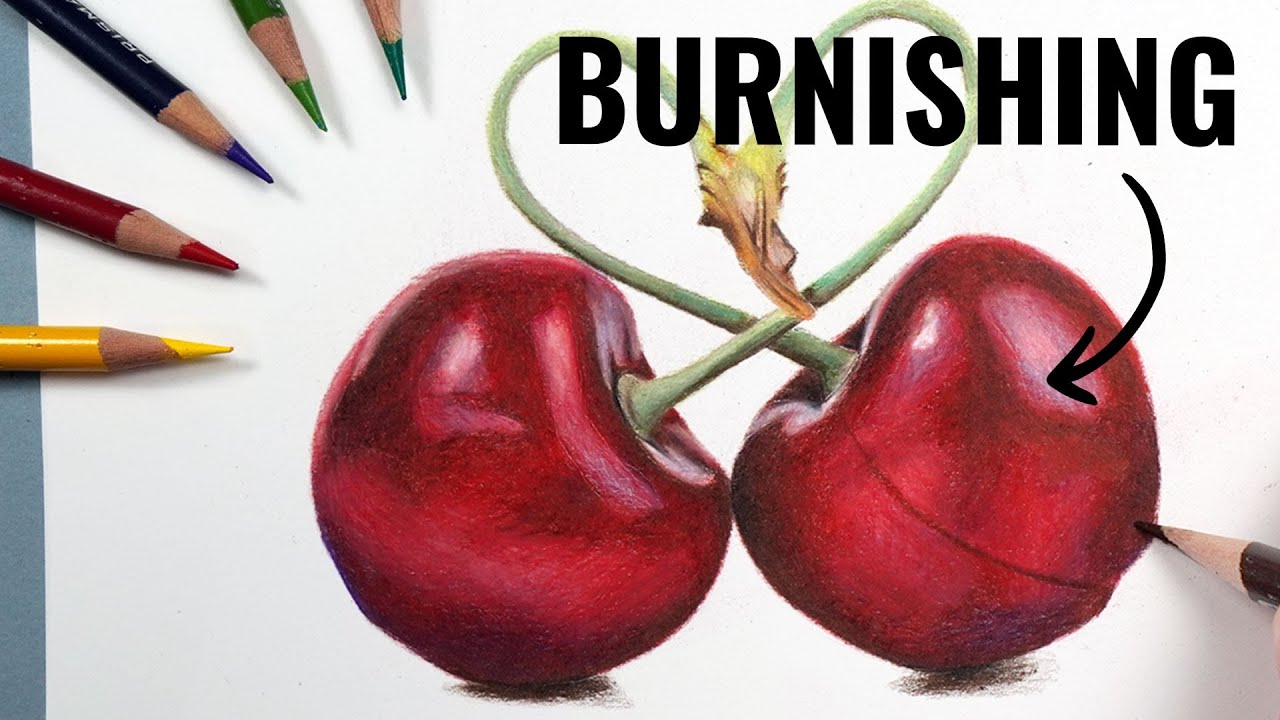
Lastly, we will talk about burnishing. Burnishing is a super important technique when it comes to colored pencils. Basically burnishing is a technique where you apply heavy pencil pressure with a pencil or colorless blender to create a polished, smooth finish. When a colorless blender is unavailable, a white or light-colored pencil can be used to burnish. Burnishing will flatten the tooth of your drawing paper and will result in a glossy, reflective surface. This creates a really uniform appearance but burnishing also makes it hard to add more pigment to the area in the future. Because of this, I recommend that burnishing should be the last step of your coloring process.
Using Solvents for Layering Color
To really make your colored pencil artwork pop, its’ essential to understand how layering works. Think of each color as a building block – you can lay down a light layer first and gradually add deeper hues on top. This not only creates depth but also allows you to develop rich, vibrant colors without overwhelming the paper. Don’t shy away from experimenting; mix different colors together to find unique shades the fit your style. Adding a splash of white or cream can help blend colors seamlessly and create highlights that bring your artwork to life.
Blending and layering your colors are crucial for achieving vibrant and realistic colored pencil art. As we discussed earlier, a colorless blender can be used to blend colors smoothly without adding any additional pigment to your paper. In addition to the colorless blender, you can also use a solvent. Solvents, like rubbing alcohol or odorless mineral spirits, break down the binder in colored pencils. This allows the pigments to blend seamlessly.
If you decide to try a solvent, apply your base colors first and then use a brush or cotton swap dipped in the solvent to blend your colors. Just use a little at a time and make sure that you are in a well-ventilated space to save your brain cells.
If you want to stay away from solvents altogether, there are some people that swear by dipping their colored pencils in water for a few minutes before coloring. This is especially true with the super cheap colored pencils (like the Crayola colored pencil sets we all had in elementary school). I would not do this with Prismacolors or any other quality colored pencils but this can help with cheap sets. The cheaper a colored pencil is, the more binder and less pigment it is likely to have. By dipping or soaking it in water first, the lead is softened and the colors go on the paper smoother and more vibrant.
A random FYI: There are a such thing as watercolor pencils. Watercolor pencils are water-soluable, which means that they have binders that dissolve when touched by water. They go onto the paper like any other colored pencil, but then you can use a wet paintbrush to blend them like paint. Watercolor pencils create a very painterly effect.

Creating Textures with Colored Pencils
Creating textures with colored pencils can add interest and realism to your artwork. Many artists like working with textured paper since the rough surface can enhance the appearance of your colored pencils. The texture of rough paper creates a natural, organic look and can add depth to your artwork. Experiment with different types of paper to see how they work with your colored pencils. Some will be have a more pronounced texture while others will be more subtle and fine-grained.
A more obvious way of creating texture is to experiment with your actual pencil strokes. Short, choppy strokes can mimic the appearance of hair or grass. Long, sweeping strokes can represent flowing water or hair. Change up your stroke lengths, directions and pencil pressure to achieve your desired texture.
Tips for Color Selection and Color Harmony
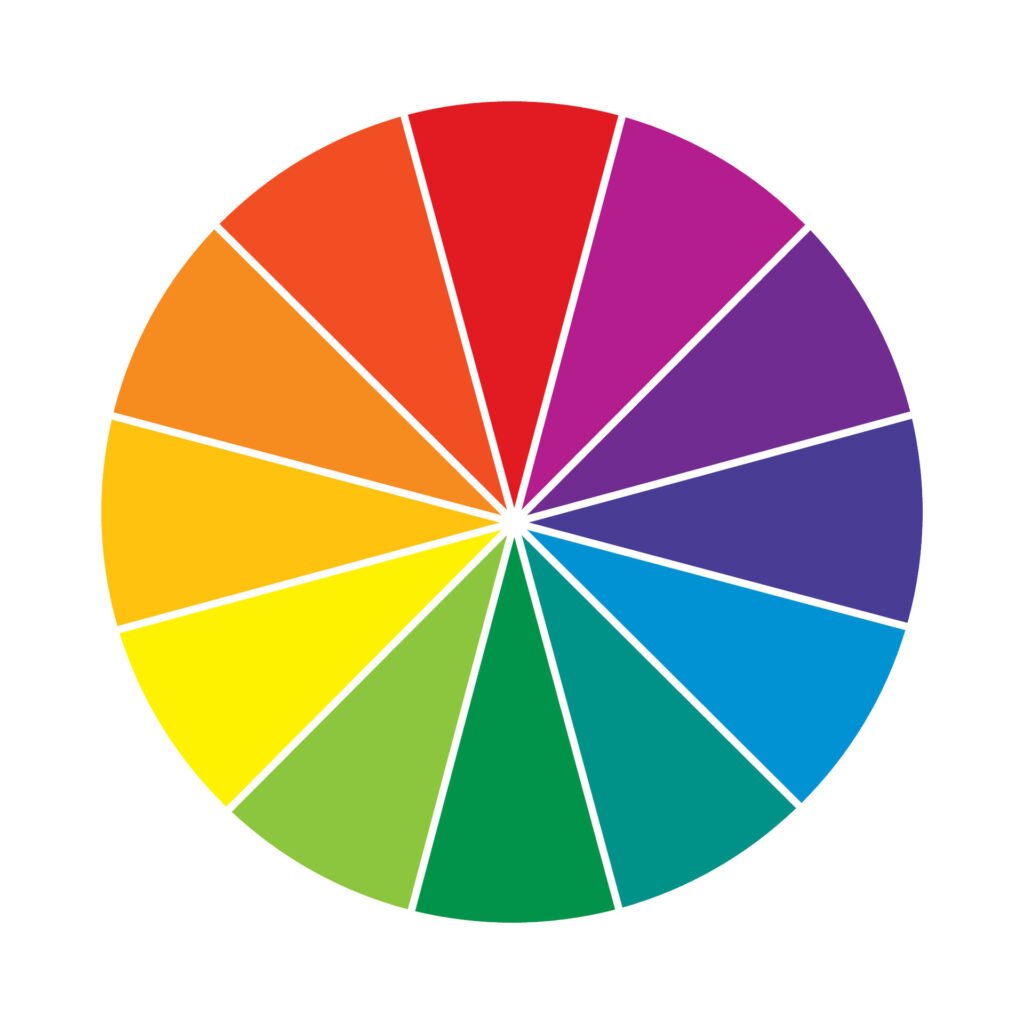
Choosing the right colors and achieving color harmony are important for creating a visually appealing artwork. I always recommend that my students use a color wheel to help them understand the relationships between colors. A color wheel can help you find specific color harmonies like analogous, complementary and triadic color schemes. Complementary colors sit across from one another on the color wheel and they create the most contrast when used together. Analogous colors are direct neighbors on the color wheel and tend to feel similar (low contrast) when used together. Triadic colors are evenly spaced apart on the color wheel and feel balanced and dynamic.
Another tip is to consider the mood that you are trying to create. What is the atmoshpere that you are creating within your artwork? Warm colors like red, yellow and orange bring warmth, energy and excitement, while cool colors (greens, blues and purples) can feel more calming.
While we can get really excited about colors, it is important to also limit your color palette. 20 different colors on one work can seem choatic and may even visually clash. Limiting the colors that you use can create a more unified and focused look. Start by choosing two or three main colors and use variations of those colors to add depth and interest. Try to prevent your work from becoming too busy or overwhelming. Consider using different tints, tones and shades of your chosen colors to add variety while maintaining color harmony.
Common Mistakes to Avoid
Even experienced artists can make mistakes, but being aware of common pitfalls can help you improve your colored pencil art. Once common mistake is applying too much pressure too soon. Heavy pressure can mke it challenging to layer and blend colors effectively. Start with light pressure and gradually build up the intensity. This allows you to create smooth transitions and avoid harsh lines.
Another mistake that you may make is forgetting to sharpen your pencils regularly. Dull pencils can lead to uneven lines and makie it difficult to achieve fine details. Keep your pencil sharp to maintain control and precision in your artwork. A good quality sharpener can help you get a sharp point without breaking the the pencil lead.
Using the wrong type of paper can also hold you back when you are working with colored pencils. Not all paper is suitable for colored pencils and using paper that is too smooth or too rough will make your work much harder. Choose paper that has enough tooth to grip the colored pencil pigment but is smooth enough to allow blending and layering.

Conclusion
Remember, to pull out the try beauty of colored pencils you must take your time and enjoy the process. Colored pencil art is a rewarding and versatile medium that offers endless possibilities for creativity and expression. By mastering basic colored pencil techniques, choosing the right tools for the job and experimenting with different projects, you can create vibrant artwork that stands out. Remember, practice and patience is key with colored pencils. SLOWLY build up your colors before burnishing. Whether you wish to create detailed illustrations, realistic portraits or landscapes, colored pencils offer a versatile and accessible way to bring your ideas to life. Use the tips and techniques in this guide and keep practicing!
Leave a Reply